Sunday, February 21, 2010

Stitch Markers for Knitting

[These instructions were originally posted on my previous craft blog, The Pink Sewing Machine. I'm moving some of the posts from there to here, so don't be surprised if this looks familiar to you.]

Here's how to make some very pretty stitch markers to use when you knit. If you're like me, you appreciate a little something extra to make your everyday activities a bit more special. These stitch markers are an easy way to put a smile in your crafting time!

But they're not *just* pretty - they're useful! They can be used to mark pattern repeats or to mark off groups of stitches on large projects to make counting stitches easier.

The easiest way of all to make stitch markers is to use jewelry toggle clasps (just the round part - we won't need the other half), pre-wired bead dangles, and a pair of needle-nosed pliers.
If you don't have jewelry toggles, you can use cabone rings. The disadvantages to using cabone rings is that you won't have the handy built-in loop to thread your bead wire through, and you won't be able to use the pre-wired dangles because the wire on them is cut too short to go around the cabone ring.

You can use head pins - my favorites are these with a decorative end - and some beads from your stash in place of the pre-wired dangles. You could also use strong sewing thread in place of the wire, sewing through the beads several times for strength. I've done it that way, too, but I prefer the wire.
If you're using the pre-wired beads, simply open the wire pin the beads are on, and thread it through the loop in the round part of the toggle. Close the wire using the pliers, making sure there is no sharp end to catch on your knitting. The packs of dangles I picked out had two styles of dangles on them, so I made two different sets. I can mix-and-match them or use them separately!


Not using the pre-made dangles? Thread your beads onto your wire head pins. Trim the excess wire, but be sure to leave enough to thread through the loop in the toggle (or to wrap around the cabone ring). Close the wire using the pliers, making sure there is no sharp end to catch on your knitting.
Notice there is one marker in this set that's bigger than the rest? That's for when I'm knitting a project on circular needles or double-pointeds. The larger marker marks the beginning of a new round, while the others mark the groups of stitches within the knitted piece itself.

See you again soon!
 ~  AlaskaGirl

Thursday, February 18, 2010

Blue scarf


When I lived in Texas, I never wore scarves. It's not like it was all that cold, so why bother, right? Well, it's different here and I find myself often grabbing a scarf off of the coat rack by the front door when I've got to be out on a chilly, breezy day.

This scarf is like many you see anywhere and everywhere - a quick beginner-level project or one that can be made while you're not really paying attention to it. But just in case you don't have the instructions for this one yet, I'll give them to ya.

You'll need one skein of Lion Brand Homespun yarn - this is color 341 Windsor. It's mostly blue, but with purple and some green undertones to it. You'll also need a pair of size 13 knitting needles and a paperback book.

First, wind the yarn completely around the paperback book 32 times. Cut only on one side so that you're left with 32 pieces of yarn. Those are for the fringes. Why did I cut the fringes first? That's an easy one: so that if you decide to just keep on knitting until you run out of yarn, this way you're assured you have enough yarn for fringe. If you don't want fringe, skip this step.

Cast on 16 stitches and knit every row. This is called garter stitch and is the type of thing you can do while watching tv, it's so easy and quick.  When you get your scarf as long as you want it, bind off. Mine was six feet long (and with the fringe added, it was almost seven feet long). Tie one strand of your fringe yarn around each stitch on each end. Or, if you didn't want the fringe and don't want leftover bits of yarn, just keep right on knitting until you get about three feet from the end of your yarn, and then bind off.  Either way, it's all good. As long as you like it and it keeps you warm, I'm happy.
See you again soon!
 ~  AlaskaGirl

Sunday, February 14, 2010

Obladi, Oblada...

It's odd, sometimes, what shows up in the grocery stores around here.

Sometimes grocery shopping means finding something that will do in place of what you really want, like plain white onions when you're very much craving leeks. That sort of thing. And then, some days, you round a corner and find an endcap display of weird imported items, and you can't help stopping to read every label of every strange, fascinating thing.

Like this auspicious find:
Oblatne!

This is the wafer part of sugar wafer cookies, but without the filling! YOU CAN MAKE YOUR OWN SUGAR WAFERS! What's that sound I hear? Is that an angelic choir? Why, I think it just might be!

These are imported from Croatia, according to the teeny-tiny English translation on the label. Also according to the teeny translation, each 9" by 11" oblatne (which means wafer) has only 126 calories, no sugar, and less than 3 grams of fat. Meaning they're basically only as bad as the filling that goes in them. Oh, the possibilities...

Since right now there are only two people at home, I'm only going to take one wafer and fill it, rather than using the whole package to make a party-sized cookie. Spread your desired filling on the wafer, spreading first in one direction and then turning to spread in the other, to make sure you've filled all the little waffle-holes with filling, which, in this case, is Nutella. I left one side of the wafer relatively un-spread so that I could save that for the top, once I got around to cutting and stacking the finished cookies.

Use a serrated knife to cut the wafer in half, stack the halves, and repeat the process until you're happy with the height of your cookie, and winding up with the unspread piece on the top. Trim the edges neatly and then eat the trimmings before anybody else gets to them!

Totally worthy of bringing out Grandma's china.


The Nutella ones were completely delish, and I could eat those every day, if only my waistline would allow it. But, for sake of variety, I filled another wafer with homemade kiwi-strawberry jam. The chunks of fruit in it made it a little difficult to stack and slice neatly, but it still worked. The wafers didn't hold up to the jam as well as to the Nutella, so for next time, I'll stick with thicker, creamier fillings.

If you want to try making your own sugar wafers, you can order oblatne online or perhaps can find them in your own grocery stores. I know I'll be going back to town for a couple more packages of these while I can still easily get them!

See you again soon!
 ~  AlaskaGirl

Happy Valentine's Day!

I hope you all had a wonderful Valentine's Day, either with your sweetie or spending it however you most wanted to. Husband and I are planning a trip into Anchorage in a couple weeks, so we kept it low-key today. Filets and scallops on the grill. Awesome. 

Evidently the moose wanted to wish us all a happy day, too, as there seemed to be so many out and about this weekend. We've had one, or sometimes two, spending the night in our yard off and on for the last week or so, but it's almost always too dark out when we see them to take their picture, so I'll just show you this one laying in the snow by the side of the road.

See you again soon!
 ~  AlaskaGirl

Friday, February 12, 2010

Yellow?

Ever wonder what color "defines" your personality? I didn't, because I crazy-love green and figured that much devotion to one color surely had some sort of significance. Not according to the True Value Color Quiz. I took the quiz this morning and was described (not too far off base, I might add) as:

You are quite the powerful thinker. It’s this talent that allows you to overcome a plethora of great obstacles. Luckily, this doesn’t affect your ego and you give off a pretty easy-going appearance. You enjoy the finer things in life and also have an attraction to art. If you can help it, you try not to rock the boat. But you also can’t stop yourself from searching for new ideas, methods or styles.


And my defining color is yellow.  

Who would have thought?

See you again soon!
 ~  AlaskaGirl


Thursday, February 11, 2010

Salmon Patties From Start To Finish

These are my guys, in our back yard, with the salmon they just caught up the road from our house.

Salmon fishing is a big deal here on the Peninsula. A very big deal indeed. Fisheries line the river and in the summer "combat fishermen" line the river, too. Subsistence fishing stocks the freezers and pantries of locals and helps insure that they have plenty to eat during the winter, and many of those locals store their salmon by canning it. Canning has the advantages of not requiring electricity for freezers during power outages, and also produces a fully-cooked product that can be eaten right out of the jar if you like. I don't (yet) have a pressure canner so the canned salmon we get is given to us by neighbors and friends. I did take a class last summer for newbies (the proper term is "cheechako") so that I can do my own canning someday. If you want to see me filet my very first salmon at that class, go visit my family blog and read the entry titled "Cheechako."

I'd never seen home-canned salmon before I helped make this batch at that class:

This is a pint jar. This is unseasoned fish, but sometimes cream cheese or jalapenos or some other spices are added before the jars go into the pressure canner. Today I'm going to use one of these pint jars of salmon to make an old standby recipe adapted from a vintage Betty Crocker cookbook.

Salmon Patties
  • 2 slices bread, crusts removed, torn into small pieces
  • 1 pint jar of salmon, OR a can of salmon from the grocery store, well drained
  • 1 or 2 eggs*
  • 1 teaspoon Worcestershire sauce
  • 1/2 teaspoon mustard
  • pinch of salt
  • seasoned dry bread crumbs for coating
  • vegetable oil for frying

*I used somewhat stale home-baked wheat bread, and I needed the second egg in order to make a cohesive mixture. Put in one egg, let the mixture sit for a minute or two, and if you can't make a nice patty out if it because it's too dry, add the other egg.

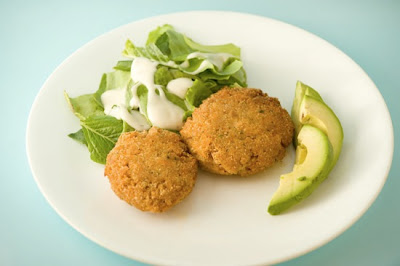
Mix bread, salmon, egg, Worcestershire sauce, mustard and salt. Form into patties, and lightly dredge in seasoned bread crumbs. Fry in hot oil 4 or 5 minutes per side until nicely browned. Serve with a sauce if you like it that way, but we eat it without.

I picked a salad from our Aerogarden and added some avocado for a delicious healthy lunch.

Now I'm stuffed. I'm going to go relax with a good book for a while. See you again soon!
 ~  AlaskaGirl

Tuesday, February 9, 2010

Well, hello there!

Hi! I'm happy you stopped by for a visit today! You've probably noticed that I don't have any crafts or recipes posted just yet, but they're coming. Yes indeedy, they're coming. I've got some knitting and some sewing and a recipe already planned out for posting... I just need to finish up the projects so I can include pics of the finished items for you.

In the meantime, I've got moose in my yard, the weekend's snow is drifting in a light wind, and I've got sewing to work on. Life's good on my crafty frontier.

See you again soon!
 ~  AlaskaGirl